How Do You Avoid the Most Common Mistakes People Make with Fiberglass Pool Maintenance?

Avoiding fiberglass pool maintenance mistakes is easier than most people think. In this video, Annie Brock from Thursday Pools breaks down the top 5 issues new pool owners run into—and the simple habits that keep your water clear and your pool finish protected.

IMPORTANT: This video covers general fiberglass pool care tips, not every possible scenario. Always follow your pool and equipment manufacturers’ guidance and consult a qualified pool professional for your specific water conditions.

How Should I Prepare My Fiberglass Pool for Winter Closing?

Annie from Thursday Pools can walk you through a simple winter-closing checklist: Thorough cleaning, dial in water chemistry, add stain and scale control, and cover it up tight. These basics protect your gel coat, keep debris out, and make next spring’s opening faster and easier.

IMPORTANT: This video includes tips to get started, not a comprehensive winterization guide. Climate, local codes, and your specific equipment vary, so always follow your manufacturer’s instructions and consult a qualified pool professional.

How Do I Backwash a Sand Filter in My Fiberglass Pool?

Keeping your fiberglass pool sparkling clean doesn’t need to be complicated, but it does require some regular care. One of the most critical parts of routine pool maintenance is making sure your filter runs efficiently. If you have a sand filter, you’ll need to know how to backwash it properly to keep your water clear and your system in top shape. The good news? Backwashing is quick, easy, and an essential step toward making every swim as refreshing as the first of the season.

Every pool relies on a filter to remove dirt, debris, and tiny particles that swimmers don’t want sharing the water. There are three main types of filters, each with their own strengths.

  • Cartridge Filters: Low-maintenance and energy-efficient. Just rinse or replace the cartridges to keep the water clear.
  • Diatomaceous Earth (DE) Filters: Ultra-fine filtration for the clearest water possible, but they require a little extra care and handling.
  • Sand Filters: Durable, cost-effective, and easy to maintain. A quick backwash flushes out trapped debris, restoring flow and clarity with minimal hassle.

What is Pool Filter Backwashing?

Backwashing a sand filter is a maintenance procedure that cleans the filter and ensures it operates efficiently. Over time, as water pumps through the sand filter, the sand traps debris and particles to remove them from the pool water. The process gradually accumulates dirt and debris in the filter, which can decrease efficiency and encourage cloudy pool water.

Backwashing temporarily reverses the water flow through the sand filter. Instead of dirty water coming in and clean water going out, backwashing pumps clean water backward through the filter. The reverse flow lifts and flushes trapped debris from the sand bed and the filter through a waste line or drain.

During backwashing, the sand within the filter loosens and allows for trapped debris to make its way out of the system. After backwashing, return the filtration system to its normal operation of filtering the pool water again. Backwashing sand filters is essential for maintaining their ability to clean the pool water effectively and should be a regular part of your pool’s maintenance routine.

Why is Backwashing My Pool’s Sand Filter So Important?

Backwashing keeps your filter functioning properly and clear of debris. It also helps to keep your water clear. Even if you are meticulous about other maintenance and consistently add chlorine to the chlorinator, check its settings, brush all the pool surfaces, empty skimmer baskets, vacuum, test water chemistry, and maintain the correct water level, your pool water will still turn cloudy if you forget to clean the filter. 

What Happens If I Don’t Backwash My Pool’s Sand Filter?

If you don’t backwash your sand filter for some time, you may notice your water getting cloudy or more debris making its way to the surface of your pool water. Other maintenance tasks are still essential, but none will replace the need for backwashing the pool’s sand filter..

How Do I Know If I Need to Backwash My Pool’s Sand Filter?

You will need to check your filter system’s pressure gauge regularly. When clean, your filter will generate a typical reading that you should note as its standard baseline. You’ll know it’s time to backwash once the gauge reaches 8 to 10 psi above your baseline reading. Your water may also look cloudy or dirty when the filter needs backwashing.

What is the Proper Way to Backwash My Pool’s Sand Filter?

  1. Turn the filter system off. 
  2. Remove, empty, and replace the skimmer basket.
  3. Attach a backwash hose to your filter’s backwash port.
  4. Turn your multi-port valve to Backwash. Never turn the multi-port valve handle while the pool filter is on and running.
  5. Turn your filter system back on. Water should flow out the backwash port and through the hose.
  6. Let the water run for about two minutes or until the water runs clear in the site glass.
  7. Turn the filter system off again.
  8. Turn the multi-port valve to Rinse. 
  9. Turn the filter system back on and rinse the filter for about 30 to 60 seconds.
  10. Turn the system off.
  11. Turn the multi-port valve to Filter.
  12. Turn the system back on.

What Are Some Potential Issues With Backwashing a Pool’s Sand Filter?

Sand in the Pool

If you notice sand in your pool during or after backwashing, then you might have cracked off laterals or piping inside the filter. You may also have too much sand in the filter. The open space from the top of the filter to the sand line is called “freeboard,” and having enough space is essential for preventing sand from exiting the filter during backwashing.

Too Much of a Good Thing

While backwashing is essential, it is possible to backwash a sand filter too often or for too long. During backwashing, turn the hose off as soon as the water runs clear. Prolonged backwashing of your sand filter can cause “channeling,” which occurs when channels develop down the sides inside the filter. Water can bypass the sand altogether because of channeling, defeating your sand filter’s purpose.

As with all aspects of your pool’s maintenance and day-to-day operations, please follow your specific sand filter’s instructions carefully. You will likely find directions on the filter itself. Your filter and pump are the backbones of pool cleanliness, safety, and enjoyment, and paying them proper attention is essential. A failure of either will cause problems and cost you money. You should consult a pool professional if you have any pool maintenance concerns.

Looking for more information on fiberglass pool maintenance? Explore Thursday Pools’ Ultimate Fiberglass Pool Maintenance Guide for a thorough look at everything you need to know.

And if you’re ready for personalized advice, connect with a local independent Thursday Pools dealer near you.

Frequently Asked Questions About Backwashing a Fiberglass Pool

  1. How do I know when it’s time to backwash my sand filter?

Check the pressure gauge on your filter. When it reads 8–10 psi higher than the clean baseline, it’s time to backwash. Cloudy water can also be a sign your filter needs cleaning.

  1. What is the correct way to backwash a sand filter?

Turn off the pump, set the multiport valve to Backwash, and restart the pump for about two minutes or until the sight glass runs clear. Then turn the pump off, switch the valve to Rinse for 30–60 seconds, and finally return it to Filter mode. Always shut off the system before moving the valve handle. (See the illustrated instructions above)

  1. Can I over-backwash my pool filter?

Yes. Backwashing for too long or too often can cause “channeling,” where water cuts paths through the sand and bypasses filtration. That’s why it’s important to stop once the water in the sight glass runs clear.

  1. Why is backwashing important for fiberglass pools?

Even with fiberglass’s lower maintenance needs, filters still collect debris, sunscreen oils, and fine particles. Backwashing clears these out, helping your system run efficiently, keeping water clear, and protecting your pump from strain.

  1. What if I see sand in my pool after backwashing?

That usually means the filter has broken laterals or too much sand. A proper freeboard (the space between sand and the top of the filter) is needed to prevent sand from escaping. In this case, inspection or repair is necessary.

  1. Do cartridge or DE filters need backwashing too?

No. Cartridge filters should be rinsed or replaced, and DE (diatomaceous earth) filters require backwashing plus recharging with fresh DE powder. Only sand filters use a standard backwashing cycle.


How to Protect Your Pool Water Balance During the Off-season


As the vibrant days of summer fade into the crisp air of autumn, fiberglass pool owners face the critical task of preparing their pools for the off-season. However, the upcoming period of dormancy does not equate to a halt in maintenance efforts. Instead, the off-season requires a strategic approach to ensure your pool water is neither corrosive nor scaling and will be ready for the next swimming season. Smart homeowners must understand the essential steps for monitoring the pool’s water chemistry balance during the colder months to safeguard against potential damage that winter can bring.


Water Chemistry Challenges in the Off-Season

Fiberglass pools, celebrated for their durability and longevity, are not immune to all the challenges of changing seasons. Fiberglass pool shells are generally resilient against winter conditions thanks to their flexibility, which can withstand stress from freezing temperatures. However, harsh winter conditions can still threaten the water balance and the pool surface if you do not properly winterize the pool. The risk of damage escalates during winter when colder water temperatures can render the water more aggressive. This aggressiveness primarily stems from the water’s chemistry balance shifting with temperature changes, potentially leading to issues that can compromise the integrity of your pool’s finish.


Seasonal Cleaning and Preparation

The first step in your off-season maintenance routine should be thoroughly cleaning your pool. End-of-season cleaning includes wiping down the waterline with a soft brush to eliminate any buildup of debris, sunscreen, body oils, and other contaminants that may have accumulated over the swimming season. Brush all pool surfaces, paying extra attention to corners and steps where algae and bacteria might accumulate. Remove all leaves, debris, and dirt from the water using a skimmer, and vacuum the pool thoroughly to eliminate any settled particles or algae. A clean pool goes beyond attractive aesthetics to create a stable foundation for your off-season water balance efforts.


The Role of a Pool Cover

Investing in a high-quality pool cover offers multiple benefits throughout the year, with its importance magnified during the off-season. A pool cover acts as a barrier against debris, reduces water evaporation, and helps maintain the pool’s water chemistry balance by minimizing external influences. 


Especially important for households with children or pets, a properly secured winter pool cover can also prevent accidental falls into the pool. Safety covers can withstand a person’s weight, providing an extra layer of protection when the pool is not in use. More than a convenience, a pool cover offers peace of mind and ensures your pool remains clean, sealed, and safe throughout the winter.


Enjoy the Benefits of Proactive Off-Season Maintenance

The effort you put into off-season maintenance directly impacts the longevity and condition of your fiberglass pool. By taking steps to clean your pool, adjust its water chemistry for the cold, periodically check its balance, and secure it with a pool cover, you protect your investment and make for an easier and more efficient opening in the spring.


A proactive approach ensures your pool remains a source of enjoyment and relaxation for many years without extensive repairs or adjustments when the swim season arrives. Embrace the off-season as an opportunity to ensure your fiberglass pool’s continued health, beauty, and enjoyment.


Frequently Asked Questions About Off-Season Pool Water Chemistry


Why is water chemistry so important during the off-season?

Cold water can shift your pool’s chemistry and become more aggressive. Keeping pH, total alkalinity, and calcium in check, and routine use of a stain and scale product, helps protect your fiberglass surface and equipment throughout the winter months.


Do I need to clean my pool before closing for the season?

Yes. A thorough cleaning is essential. Brush all surfaces, skim, and vacuum to eliminate algae, dirt, and debris. A clean pool sets the stage for stable water chemistry all winter long.


What role does a pool cover play in off-season maintenance?

A high-quality pool cover keeps debris, dirt, and leaves out of the water, reduces evaporation, and helps preserve your pool’s chemical balance. Covers make winter care easier and spring openings faster.


Should I check my pool’s water chemistry during the winter?

Yes. Weather permitting, check the water’s balance periodically. Cold water’s chemistry can still shift over time, and making small adjustments ensures it remains stable. Regular checks prevent surprises at spring opening and help extend the life and beauty of your fiberglass pool.


What are the most common mistakes pool owners make during the off-season?

The biggest mistakes include failing to balance water chemistry for colder temperatures, skipping a thorough cleaning before closing, and not using a quality pool cover. Neglecting these steps can lead to algae growth, staining, scaling, or corrosion that makes spring opening more difficult and costly.


How does proper off-season care make spring opening easier?

When you clean, balance, and cover your pool correctly before winter, you prevent debris buildup and chemical imbalances. That means fewer surprises—like cloudy water, stains, or equipment issues—when you reopen. A proactive approach saves time, reduces costs, and helps you start swimming sooner in the spring.

Five Essential Steps to Maintain Your Pool’s Finish

For many homeowners, the benefit of reduced maintenance responsibilities is influential in their decision to install a fiberglass pool in their backyard. The non-porous surface of a fiberglass pool significantly lessens the likelihood of algae growth and reduces the demand for chemicals to maintain water balance. This inherent characteristic of fiberglass pools substantially contributes to their appeal, offering homeowners more time to enjoy their aquatic sanctuary with less laborious upkeep. However, it’s crucial to understand that “lower maintenance” does not equate to “maintenance-free.” Maintaining your pool’s vibrant, smooth finish is just as important as keeping the water clear and inviting. While the allure of crystal-clear water is undeniable, the unseen balance of water chemistry plays a crucial role in preserving the integrity and appearance of your pool. 


Step 1: Use a Stain and Scale Control Product Regularly


Even well-balanced water can carry minerals that deposit on your pool’s surface, leading to staining or scale buildup. A reliable stain and scale control product helps prevent fiberglass pool discoloration with chelating agents that can effectively shield your pool from calcium. In our experience, products like SC-1000 by Orenda and Scale & Stain Eliminator by Pool Stain Removers work well and should be part of your regular pool maintenance routine.


Step 2: Maintain Chlorine Levels Between 1-3 ppm


Chlorine protects your pool from harmful bacteria and algae. While chlorine is essential, too much can harm your pool’s finish. Keep free chlorine between 1 and 3 ppm. Beware of exceeding 5 ppm, as high chlorine levels can cause irreversible damage to your pool’s surface, leading to discoloration and degradation of the gelcoat.


Step 3: Avoid Calcium Hypochlorite


While calcium hypochlorite is common in various pool contexts for shock treatments, it poses risks for fiberglass pool surfaces due to its propensity to elevate pH levels and deliver a high dose of free chlorine. Liquid chlorine is a preferable alternative, offering a safer means to manage pool hygiene without the associated risks of calcium hypochlorite. Nevertheless, vigilance is required to prevent the adverse effects of excessive chlorine, ensuring the pool’s surface remains pristine.


Step 4: Keep pH Between 7.2 and 7.4


Maintaining a pH range between 7.2 and 7.4 keeps your chlorine effective and protects the pool’s surface. A pH above 7.6 can contribute to scaling and discoloration, while a pH that’s too low can lead to etching. Regular testing and adjustments help keep this critical pool maintenance parameter within range.


Step 5: Maintain Calcium Hardness Below 120 ppm


Fiberglass pools don’t need the same high calcium levels as concrete pools. Keeping calcium hardness less than 120 ppm helps prevent scale buildup and maintains the beauty of your surface finish. Do not add calcium-based products. If your water’s calcium hardness is greater than 120 ppm, use a chelating stain and scale control product to prevent scaling and discoloration.


Bonus Tip: Don’t Assume Your Pool Pros Know it All!


The pool maintenance industry is constantly evolving, with new products and refined best practices emerging regularly. As a pool owner, staying informed about these developments is beneficial to ensure your pool receives the best care possible.


Engage with your pool maintenance professionals and inquire whether they are familiar with specific parameters for fiberglass pools. Fiberglass pools are unique, and maintenance pros should treat them as such.


By following these five essential tips and staying on top of your water chemistry, you’ll protect your pool’s beauty and performance for years to come. Pool ownership is a journey. When you have the right knowledge, it’s a journey you can enjoy with confidence.


Looking for more information on fiberglass pool care? Explore Thursday Pools’ Ultimate Fiberglass Pool Maintenance Guide for a thorough look at everything you need to know.


And if you’re ready for personalized advice, connect with a local independent Thursday Pools dealer near you.


Frequently Asked Questions About Maintaining a Fiberglass Pool Finish


How do I protect my fiberglass pool’s finish?

Test your water often, keep chlorine between 1-3 ppm, maintain pH between 7.2-7.4, and use a stain and scale control product that chelates calcium. These steps prevent discoloration, scaling, and surface damage.


Why should I avoid calcium hypochlorite in a fiberglass pool?

Calcium hypochlorite raises pH and delivers a strong chlorine dose that can harm your pool’s gelcoat. Use liquid chlorine instead to sanitize safely.


What calcium hardness level works best for fiberglass pools?

Keep calcium hardness below 120 ppm. Higher levels can cause scale buildup and discoloration. Use a stain and scale control product that chelates calcium if you have naturally hard water with high calcium hardness, such as SC-1000 by Orenda or Scale & Stain Eliminator by Pool Stain Removers.


Does clear water always mean my pool water is balanced?

No. Water can look crystal clear but still be corrosive or scaling. Always test and adjust based on the LSI balance, especially as water temperature changes.


Should I rely on a pool service professional for water balance?

Stay informed and ask questions. Fiberglass pools require specific care, and not every pool professional knows the latest best practices. Double-check your pool’s water chemistry balance yourself regularly.

How Do I Balance My Pool Water Using LSI?

Balancing your pool water is essential for maintaining its clarity, safety, and longevity, especially for fiberglass pool owners. While pool water chemistry balance may seem complex, modern tools like the Orenda Technologies LSI Calculator have simplified the testing and adjustment process. This blog post will guide you through using Orenda’s app to achieve optimal water balance in your pool, ensuring it stays in beautiful condition without needing a degree in chemistry. We’ve included step-by-step instructions, complemented by screen-capture images, to make the process as straightforward as possible.

Editor’s Note: There are available alternatives to the Orenda app. Thursday Pools and Orenda have no relationship other than sharing a desire to help fiberglass pool owners properly maintain their water chemistry. If you want to get even more informed on water balance and related topics, check out Orenda’s library of educational videos, tutorials, and other resources. 

Step 1: Download the Orenda App

The journey to balanced pool water begins with a simple download of the Orenda app, available on both iOS and Android platforms. This app significantly simplifies pool chemistry, particularly focusing on the Langelier Saturation Index (LSI), making it an indispensable tool for pool owners.


Orenda App


Step 2: Input Your Pool Details

Once you have downloaded and opened the app, the first step is to input your pool’s specific details, such as the volume of your pool in gallons and the water temperature, which are critical for accurate calculations. The app’s user-friendly interface guides you through entering these initial details.


Step 3: Enter Current Water Chemistry Levels

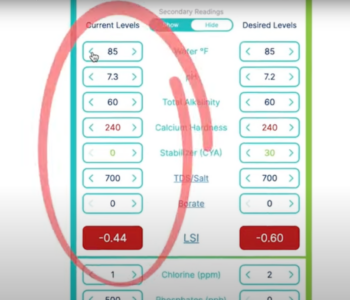
The next step involves inputting the current levels of various water chemistry variables that influence your pool’s LSI.

Water Chemistry Levels

These include: 

  • Water temperature
  • pH level
  • Calcium Hardness
  • Total Alkalinity
  • Cyanuric Acid stabilizer
  • Total Dissolved Solids

You’ll find a section on the left-hand side of the app dedicated to entering these values. Precise measurements at this stage are crucial for accurately assessing your pool’s water balance. 

Also, note that the app includes levels for Chlorine and Phosphates. While these values don’t affect the LSI, they are essential in maintaining a healthy and safe pool.


Step 4: Adjusting for Optimal LSI

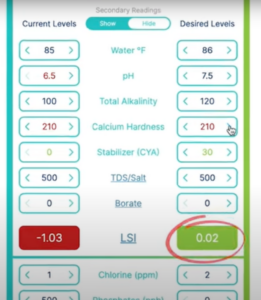
After entering your pool’s details and current chemistry levels, the real magic begins. The app allows you to tweak and adjust the values on the right-hand side of the screen to see how changes can affect your pool’s LSI. 

The goal is to adjust these levels until you achieve a desired LSI value within the optimal range of -0.3 to +0.3. Note that for saltwater pools, we recommend a slightly tighter range of -0.2 to +0.2 to account for the unique chemistry of saltwater systems.

Optimal LSI

The app’s LSI indicator is highlighted in different colors depending on the status. 

  •   Over +0.30 is coded PURPLE, meaning your water can cause scaling on your equipment and gelcoat surface. 
  • -0.30 to +0.30 is coded GREEN to indicate the ideal LSI balance. 
  • -0.30 to -0.01 is YELLOW, meaning you’re close to balance but not quite there. 
  • < -0.30 is coded RED to alert you to corrosive water that can damage your pool equipment and gelcoat surface.

The ideal target is as close to zero as possible. This interactive feature allows you to experiment with different adjustments to understand how each factor may affect your pool’s overall balance.


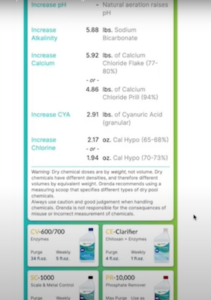
Calculate and Correct

Step 5: Calculate and Correct

After adjusting your inputs to reach the ideal LSI range, hitting the “Calculate” button creates a customized list of actions and products needed to balance your pool water. It tells you what needs to be adjusted and recommends specific chemicals and quantities to achieve the desired balance. This step eliminates guesswork, ensuring you use the right products in the right amounts.

Step 6: Implement Recommendations

With a tailored action plan, the final step is implementing the app’s recommendations. Whether adjusting the pH, adding calcium hardness increaser, or balancing total alkalinity, follow the guidelines to bring your pool water into harmony.

Why Use the Orenda App?

Simplifies Complex Calculations

The Orenda app demystifies the complexity of water chemistry, breaking it down into simple and manageable steps. This guidance ensures that pool owners can maintain their pool’s health without needing deep technical knowledge.

Saves Time and Money

By providing precise recommendations, the app helps pool owners avoid over- or under-treating their pool, saving money on chemicals and preventing potential damage to the pool’s surface or equipment.

Enhances Pool Enjoyment

Regularly using the Orenda app to balance your pool water means clearer, safer water and a more enjoyable swimming experience for you and your family. It also extends the lifespan of your pool by preventing damage and other issues related to imbalanced water.

Balancing your pool water using the LSI doesn’t have to be daunting. With the Orenda Technologies LSI Calculator, achieving and maintaining optimal water balance is easier and more intuitive than ever. By following the simple steps outlined above and taking advantage of the app’s smart recommendations, you can ensure your pool remains an enjoyable oasis for years to come.


Do You Need to Brush a Fiberglass Pool?

Thursday Pools' side view of the California Rectangular poolFiberglass pools are incredibly popular for good reasons. They are luxurious, long-lasting, and can create a beautiful backyard backdrop for many memorable moments with your family and friends. Like many major purchases and luxury items worth having, however, they require care and ongoing maintenance to stay in peak condition. Do you need to brush a fiberglass pool? That’s one of the most common questions homeowners ask when considering the prospective upkeep responsibilities with their pool purchase.


All pools, including fiberglass pools, have several essential maintenance tasks homeowners must perform—or hire local pool service professionals to handle—on a regular basis in order to keep them clean, safe, and functioning properly. The good news is that, thanks to their durable materials and innovative manufacturing methods, fiberglass pools require fewer chemicals and are easier to take care of than other inground pool types. Similar to other pool types, brushing is necessary with fiberglass pools, but it’s far from labor-intensive work and nothing to be afraid of.


Why Do You Brush a Fiberglass Pool?


While fiberglass pools are algae-resistant, dirt and debris buildup may become a daily occurrence with backyard landscaping surrounding the pool. Brushing your fiberglass pool helps prevent unwanted debris from settling in one place for too long and causing staining. After adding chemicals to your pool, brushing is a good agitating activity to help chemicals dissolve and circulate quickly.


How Often Should You Brush a Fiberglass Pool?


The frequency with which you should brush your fiberglass pool depends on how much dirt and debris get in your pool, how often you use the pool, and whether or not you have a pool cover. While your fiberglass pool may need more frequent brushing after prolonged periods of heavy use or bad weather, a good general rule of thumb is to give it a good brushing once or twice per week.


What Kind of Brush Do You Use for a Fiberglass Pool?


Thursday Pools' plastic brush on wooden backgrounds.

As opposed to the hard scrubbing necessary for pools with porous surfaces, fiberglass pools dictate a delicate, gentle touch to avoid scratching the gelcoat. The only type of brush you should use on a fiberglass pool is one with poly or nylon bristles. You should also consider your pool’s shape when choosing a brush for a fiberglass pool. If your pool is rectangular, choose a flat, rectangular brush to get into the corners. If your pool is freeform, choose a brush with a curved head.


How Do You Brush a Fiberglass Pool?


Push your soft-bristle brush over the entire pool surface, including the walls, floor, and any stairs, benches, or tanning ledges. Brushing the pool surfaces helps kick up caked-on dirt and debris in order to circulate it into the pool skimmer and filter system. Depending on the amount of dirt and debris, you may want to backwash your filter.


Do You Brush a Fiberglass Pool Before Vacuuming?  


Brushing and vacuuming are both essential fiberglass pool maintenance responsibilities, but do not brush your pool directly before vacuuming. Brushing the pool “kicks up” the dirt and debris that was stuck to the surface, causing it to float in the water. Wait to run your pool vacuum until after particles reach the main drain and filter or settle back on the surface.


Keep Your Pool Smooth and Stunning

Thursday Pools' Maya rectangular pool

You will need to brush your fiberglass pool as part of your regular care and maintenance routine. Brushing is one of the most important ways you can keep your fiberglass pool’s surface beautiful, and it isn’t a very time-consuming or labor-intensive activity. 


Looking for more information on fiberglass pool care? Explore Thursday Pools’ Ultimate Fiberglass Pool Maintenance Guide for a thorough look at everything you need to know.

Do you have questions about pool brushes, other cleaning tools, or how to plan for fiberglass pool maintenance? Connect with an independent Thursday Pools dealer near you. They can walk you through best practices, answer your questions, and help you brush off concerns and enjoy your pool with confidence.

How To Close An Inground Pool

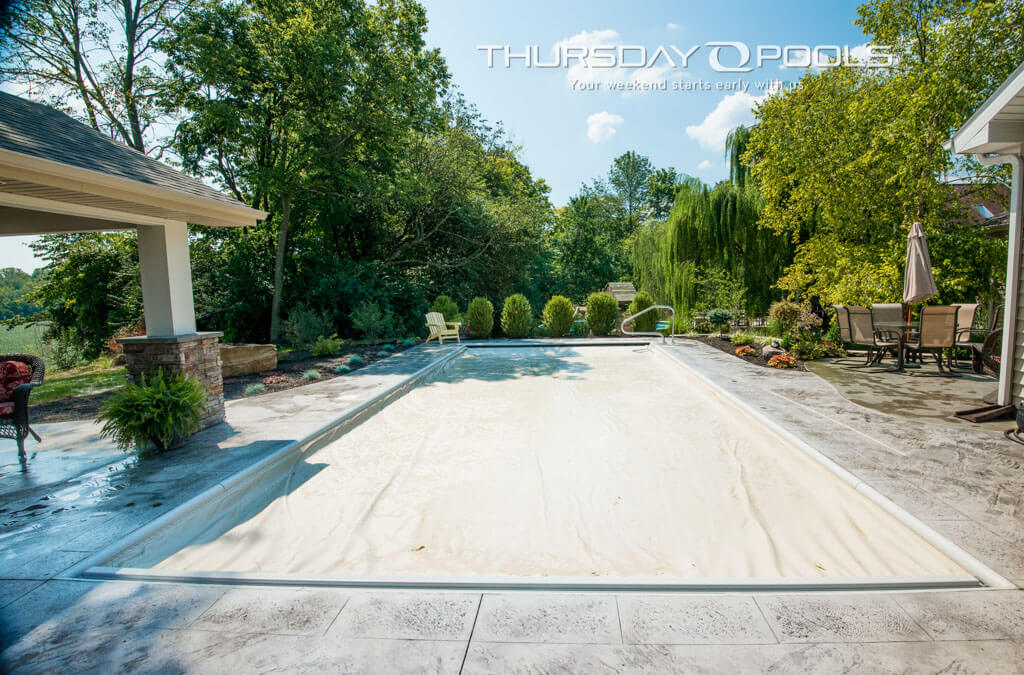
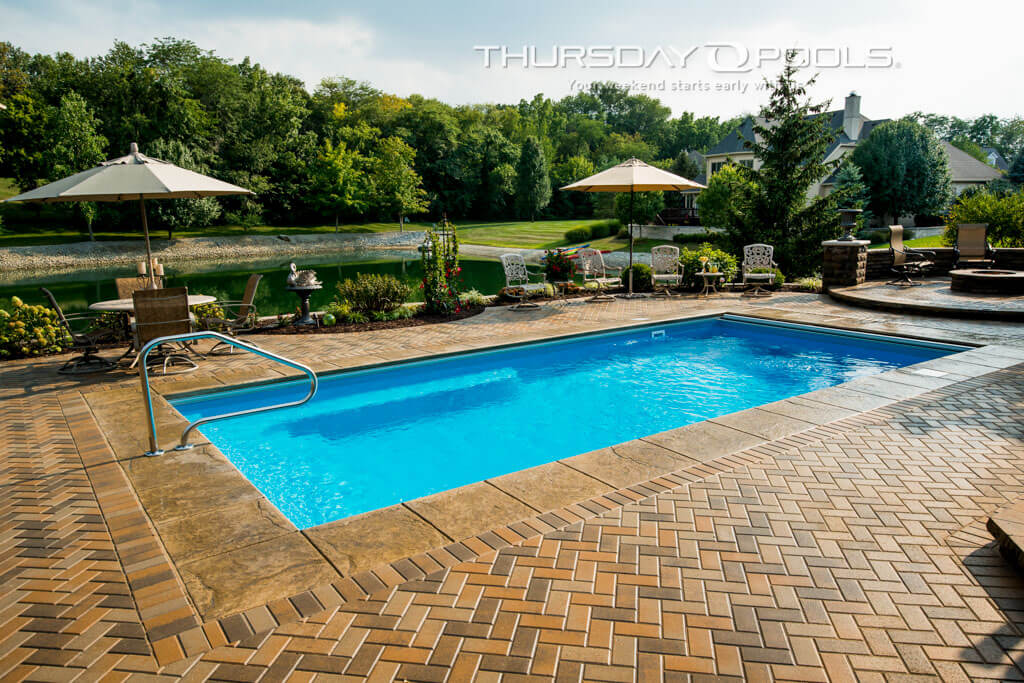
Closed Inground PoolFor some, it’s a season of denial, but when that first multi-hued leaf hits the water, it’s hard to ignore the reality that it’s fast becoming time to close the pool. If you’re in a temperate climate, you’ll want to winterize your pool to set yourself up for continued enjoyment when the weather is warmer. Whether closing an above-ground pool or an inground pool, many of the same principles apply. However, your regimen and costs may vary if you are closing a vinyl or gunite inground pool. For a more in-depth comparison of fiberglass vs vinyl vs gunite, download our free eBook. In this post, we will cover how to close an inground pool that is fiberglass. 
STEPS TO AN INGROUND FIBERGLASS POOL CLOSING

    1. Set a date. Get it on your calendar, and if you need to get on the schedule for pool service, it’s wise to make an appointment as early as possible before the time slots fill up.
    2. Balance your water chemistry. Even if you’ve hired a pool service company, there are likely tasks you should perform in advance. One is making sure you’ve established proper water chemistry. That includes checking and balancing for alkalinity, pH, free chlorine, calcium hardness, salt, stabilizer, metals, and dissolved solids. Note: the “eyeball test” will not cut it. Water that is pristine in appearance can still be harmful or out of balance. That’s why we test. Keep in mind that balance also refers to the neutrality of the water, meaning you don’t want water that is too acidic (can cause corrosion) or too basic (can cause scaling/deposit buildup). Your Thursday Pools Owner’s Manual is a great resource for recommended water chemistry levels.
      NOTE: do not treat your fiberglass pool with calcium hypochlorite because the percent of free chlorine is so high that it can damage the pool surface.
    3. Wipe down the scum line. Otherwise known as the “water line” or “tile line,” the “scum line” is a result of body oils, lotions, and environmental contaminants that float on the surface of pools and leave a mark that is usually harmless but doesn’t look good. This blemish could become a bigger problem if left unattended. Note: Be gentle. Use a light touch with a wiping cloth or brush – don’t scrape – to preserve the gel coat of your pool.
    4. Clean. Give your pool a final skim, vacuum, clean the filter baskets, and backwash the filter before the pool service company arrives. (The General gave us a good primer on backwashing and the ins and outs of a sand filter)
    5. Add winterizing chemicals. Add the final chemicals in your winterizing process the day before your service company arrives, allowing time for the chemicals to take effect before their arrival. If your water is properly balanced, no additional chlorine is necessary. With no swimmer use and cooler water temperatures, chlorine demand over the winter months remains very low. 
    6. Tidy up. We’ve talked mostly about chemicals up to this point. Organize and store those chemicals tightly and securely in a well-ventilated space, with special care not to place caustic chemicals too close to each other. In addition, tidy up your pool accessories, toys, and furniture. This could include pulling out ladders, diving boards, and other fixtures and checking them for wear and tear. If you have a secured or immovable element, like a slide, it’s a good idea to give it a protective wax that will set it up for continued use in the spring.
    7. Cover it. We recommend automatic pool covers for safety, security, and pool hygiene. If you get an automatic pool cover, you will be pleased with its contribution to a quality pool closing.

FAQ. A lot of new customers ask, “Should I drain my inground pool for the winter?” The answer is absolutely not. You risk structural damage if you drain your pool of water. Professional pool installers take great care to reduce the abundance of hydrostatic pressure from groundwater, but it is always there, and water in the pool counterbalances that external pressure. Recent technological innovations can lessen the impact of groundwater. 

If you must remove some water from your pool or if water is captured on top of your pool cover, drain it away from the deck, and be careful to leave water in the pool above the skimmer level. If you absolutely must drain the water completely from your pool, please consult with a professional. That can protect you against voiding your warranty. 

HOW MUCH DOES IT COST TO CLOSE A POOL? 

The cost of closing a pool will vary based on your area, but a national average is around $250. For reference, here are monthly cost estimates of pool chemicals: 

  • pH increaser/decreaser $10/mo
  • Calcium hardness increaser $20/mo
  • Stabilizer (cyanuric acid) $25/mo
  • Sanitizer (chlorine) $40/mo
  • Shock $38/mo
  • Algaecide $15/mo 

As previously mentioned, the costs will vary based on your geography, your commitment to regular maintenance, your vigilant use of a pool cover, and other factors. If you’re still pondering questions like “how much shock will I need for my pool?”, we have a guide that provides some size/cost ratios on the most used chemicals. 

BOTTOM LINE 

Winterizing or closing your pool for the season is part of a disciplined approach to pool ownership. The season, and a period of disuse, can have negative consequences for your pool. By keeping a regular maintenance schedule all year long and giving special attention to a proper seasonal closing, you can keep your inground fiberglass pool in good shape for many years to come. 

Ask the General: How Do I Troubleshoot the Heater and Chlorinator on My Fiberglass Pool?

Some pool troubleshooting tips to try before you call in the pros. 

Dear General- 

We are fiberglass pool owner newbies. We love it, but we did have to call an inground pool service pro a couple of times—once for our heater and another time for our chlorinator. Both times, it turned out to be a fairly simple fix and we wished we had tried to troubleshoot the problem ourselves before we called. Do you have some pool troubleshooting tips to share? 

Signed- Newbies in New Orleans

Dear Newbies- 

inground fiberglass poolsOf course, I’m happy to share pool troubleshooting tips, especially for new pool owners. You didn’t say what kind of heater or filtration system you use, so I’m just going to go with one of the most common combinations: a gas heater with a sand filter and a chlorine-sanitized system.

Let’s start with the heater.

  • Do a visual inspection. Your first pool troubleshooting step is simply taking a look at the unit. You’re looking for leaks, rust or burn marks. Any of these visual clues most likely mean trouble inside the unit, and you probably need to bring in a pool maintenance pro to check it out. 
  • Clean it off. You should be regularly cleaning debris off of the heater top and inside of the cabinet. Leaves and other matter can really gunk up the works, so this is an easy way to avoid trouble before it starts. If you haven’t done this, you may find that debris is hindering your heater’s operation, so clean it up and see if that helps. 
  • Check the gas and water pressure. If the gas valve isn’t fully open, your heater will not fire. The same is true if there’s not enough water flowing through the heater, so make sure your pool pump is working properly as well. In many cases, you’ll just need to backwash the sand filter, or clean the cartridges in a cartridge filter. 
  • Consult your owner’s manual. After you’ve tried these tips, if you’re still having trouble, it’s always worth a peek at your owner’s manual. Depending on what brand and type of heater you have, you may find some additional help there. 

Some safety tips for you: 

  • Never bypass a safety feature on a heater to force it to operate. I once had a homeowner call to say that their heater’s door blew off.  Upon arrival, I discovered that the propane heater was equipped with a jumper wire to take out the safety link that protects the heater in case of a down draft. Apparently, this guy’s brother-in-law had “fixed it” by jumping the safety link to get the heater to operate, and they never called a technician to permanently repair the heater. That resulted in a very dangerous situation. Everything inside your heater is designed for safety, and other than these few pool troubleshooting tips, there are very few things that most homeowners can fix on their own. If these tips don’t yield any clues, call a professional pool service technician. 
  • Be aware that the top of a gas heater gets very hot. Use caution to prevent burns. I’ve seen melted cell phones, plastic cups and screwdriver handles as well as ruined shirts and shoes. So don’t put anything you value on top of your heater. 

The next stop is the chlorinator. 

There are many different manufacturers of chlorinators with different functionalities (such as high back-pressure systems with pop-up heads, or offline “tube” feeder systems.) So for now, we’ll just address the most common one—the inline chlorinator. Personally, I have a Hayward CL-200 inline chlorinator on my pool, and it’s been there for almost 35 years. I think it may be the only thing I haven’t had to replace. 

  • Again, start with a visual inspection. You’re looking for leaks, hairline cracks, and plant life that may have grown around the unit. If you find cracks, you may need to replace your unit. If you find plant life growing around your unit, you need to remove it.
  • Check the gaskets. If your unit is leaking, normally a lid gasket or drain plug gasket is the cause. If you find leaks here, these gaskets may just need to be replaced. 
  • Clean the canister. Turn off the pump, remove the lid and inspect the inside of the canister. There may be buildup in there that’s blocking the flow. Carefully remove any undissolved chlorine, remove the bottom plug, scrape off the inside, wipe out the residue, and flush it with water. If the unit has unions, remove and completely clean them. Using high quality chlorine pucks (or sticks) will alleviate the need to do this very often.

Some safety tips for you: 

  • Always use caution when opening the unit to avoid breathing chlorine gas buildup.
  • Take care that the chlorine doesn’t splash in your eyes or on your skin. 
  • Never use solvents or any chemical that may react with the chlorine to clean the inside.
  • Be sure to read the manufacturer safety warnings for your chlorinator.

It’s a process.

It may take some time before you learn all the things that pool owners know. To shorten your learning curve, see if your local pool company has “pool school” seminars to help you learn the ins and outs of pool ownership. In the meantime, stay on top of your regular pool maintenance to avoid problems (which should be pretty easy with your low-maintenance fiberglass pool!) and kick back and enjoy your new pool as much as you can. 

Until next time- The General

Who is The General? 

The man, the myth, the legend … we just call him The General. His organized, systematic approach to pool installations over the years had his crew members calling him “The General” and it stuck. The General has over 30 years’ experience in the pool and spa industry, working for one of Pool and Spa News’ Top 50 Pool Builders.”

Over that time, he designed, sold, project-managed and installed over a thousand inground swimming pools. As a pool owner himself, he’s the perfect authority to give you the inside scoop, with amazing tips and tricks to make pool ownership a breeze! 

Ask the General; How Do I Troubleshoot the Pump on my Fiberglass Pool?

Five pool pump troubleshooting tips before you call the pros.

Dear General- 

It’s still pretty warm in Atlanta, and we haven’t yet closed our fiberglass pool. Over the last few days, our pool pump has started making some strange noises. It doesn’t happen all the time, but we’re not sure what we should do about it. Do you have any swimming pool pump troubleshooting tips for us, or is it time to call in the pros?

Signed- Addled in Atlanta

Dear Addled- 

inground fiberglass poolsWhile northerners are thinking about winter pool maintenance, we realize that other places across the country are still enjoying swim season. That said, I appreciate your question and do have a few tricks up my sleeve that you can try before you call the pros.

  1. Check your water level. Your pool pump may be struggling to get water. Pool pumps can only operate in a “closed” system. This means that they’re only designed to pump water—not air. When your water is low and it cascades into the skimmer, it’s bringing air along with the water into the system, which is not a good thing.

If you want to know the physics behind how your pump works, here it is: a pool has a centrifugal pump with an impeller and a diffuser that spins and creates a low pressure area in the eye of the impeller. This, with the help of atmospheric pressure allows the water to be pulled through the pump. There is no diaphragm that actually pumps to move the water. So, air disrupts the pressure levels necessary to keep the water moving.

If that was “TMI” for you, then just know that your pump is just not gonna work right if you get air in your system. Add some water to your pool.

  1. Check your skimmer baskets and main drain. If your skimmer baskets are full, or your main drain is covered by debris, your pool pump will struggle to maintain prime. Again, because your fiberglass pool pump needs water to function properly, impaired water flow is going to cause it to work too hard. So, if your pump seems to be working overtime, it might be as simple a fix as cleaning out your skimmer baskets (which you should be doing regularly anyway, as part of your pool maintenance program), or clearing the debris off your main drain.
  2. Check for air leaks. A cracked pump basket gasket, or a defective O-ring on the access plug can allow air into the system. Look for loose or damaged pump drain plugs at the bottom of the basket or on the side of the pump. Also inspect the pump basket lid and the pump basket itself for cracks.
  3. Check the pump basket and impeller for clogs. If your dog swims in the pool with you, or you happen to have a cottonwood tree in the neighborhood, you’ll find that hair or seed cotton can really clog up the impeller.  A skimmer basket and pump basket can only catch debris larger than the grate holes they have molded into them. So, you should install a fine mesh filter in your skimmers to catch hair, tree buds, and cottonwood seeds before they make it to the pump and filter
  4. Backwash your filter. Whether you have a cartridge filter or a sand filter, a dirty filter will not allow water to be pumped through it. This can also put a serious strain on your pool pump. I’ve talked about the importance of backwashing your filter before, so if you need a refresher, check out this article.

If none of these tips fix your pool pump problem, it’s time to call the pros. 

If you have checked all the things I’ve outlined above, and your pump is still making noise (especially if it sounds like grinding, buzzing, or even screaming), shut it off right away and call your local pool service technician for help. They might be able to fix it, or it might be time for a new pump. Either way, it shouldn’t be too long before you’re right back in the pool, enjoying the sunshine. Happy swimming.

Until next time- The General 

Who is The General? 

The man, the myth, the legend … we just call him The General. His organized, systematic approach to pool installations over the years had his crew members calling him “The General” and it stuck. The General has over 30 years’ experience in the pool and spa industry, working for one of Pool and Spa News’ “Top 50 Pool Builders.” 

Over that time, he designed, sold, project-managed and installed over a thousand inground swimming pools. As a pool owner himself, he’s the perfect authority to give you the inside scoop, with amazing tips and tricks to make pool ownership a breeze!